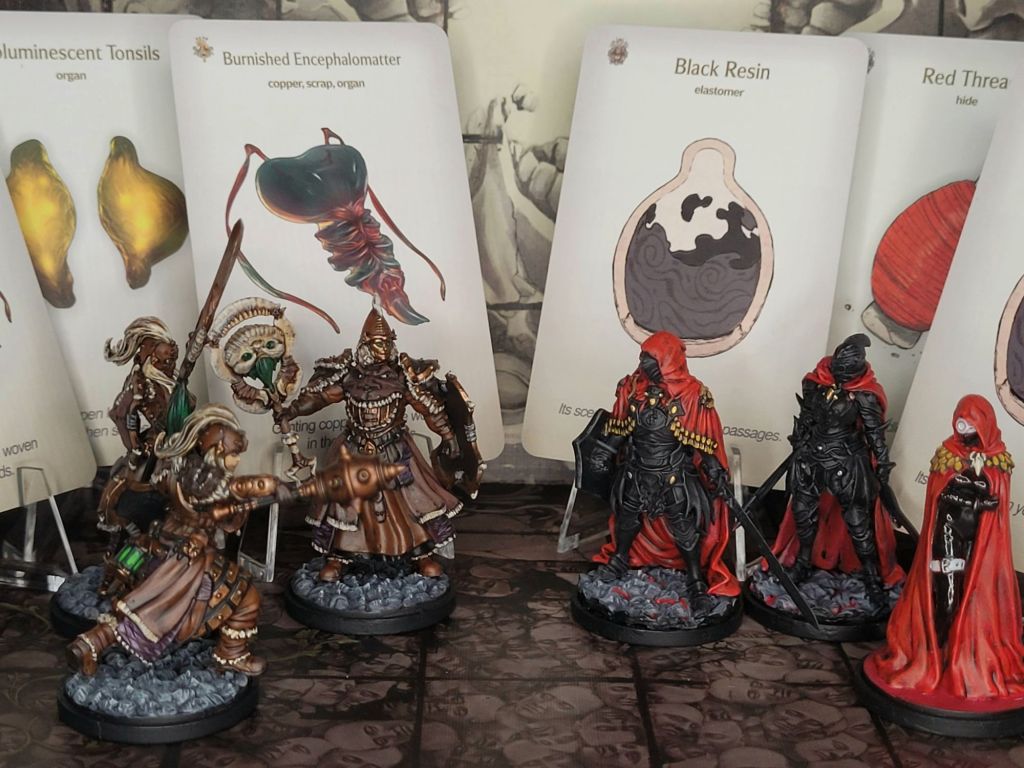
Whilst most people are currently still awaiting the arrival of their Screaming God and the accompanying Parasite Queen, today I wanted to finally take the time and have a look at components and gear from 2 of the other comparatively “new” expansions.
Released in 2024 and 2025 respectively, both the Frogdog and Red Witches are a part of the Inverted Mountain campaign and feature something quite special when compared to most other expansions: a new resource type akin to Iron for the player to collect during the hunt-phase!
For the Frogdog this is copper and for the Red Witches it is elastomer.
Not only do these resources come with a full crafting location of new weapons and items, but also an armor set and a Mineral Gathering-esque hunt event.
Yes, you will find yourself to be forced to work for your new toys! It isn’t just part of the monster-loot – even for the Nemesis monster!
Usually I wouldn’t consider this alone reason enough to go out of my way and put together a post, blast my brain with percentage-math for a couple of hours and then try to compile my findings into something half-way intelligible, but with these 2 resources something happened that I probably could have expected but didn’t.
The general community-reaction – at least the one that I got to perceive – has been largely one-sided.
Whilst the Black and Red Armor received almost universal praise for being generally well-thought-out and how it added strategic depth to basically all stages of the game, copper had been largely thrown to the way-side and proclaimed much too difficult to gather to ever be worth even attempting to make, especially with how one-dimensional the armor and weapons are.
Now, if you have been on this site before, there is a good chance that you already know that I was never going to write all this to trash on copper – I have called myself a copper-apologist several times in the past and I do stand by this whole-heartedly. The Bullfrogdog Armor is legitimately one of my favorite armor sets, as simple and straight-forward as it may be. It brings the *bonk* unapologetically and is the bunga to my unga.
.. Unga-bunga protects! .. and such..
Curiously, I am not here trying to rag on Black and Red Armor either.
However, I do believe that there is at least some degree of misconception in regards of what these gear sets can and can’t do, or are meant to do and I also don’t think people really took the costs of the items into account as well – as in both the oh-so grandios opportunity-costs as well as just quantity in relation to their quality.
All of these jumbled up possible reasons are why I wanted to look at both copper and elastomer for a while now – to understand the one-sided disliking a bit better and/or perhaps prove it wrong, or at the very least provide a counter argument.
There will be spoilers for gear and hunt-events.
***
In hopes of avoiding me running blindly into a thematic wall, I want to quickly preface this by saying that, considering how long either of these 2 boxes have been out already, perception might also have already shifted and it is likely to change and evolve further with other “modern” expansions and White Boxes as they are eventually released. For example: we do know the Gryphon (QN4) will have elastomer and I am fully expecting the Inverted Mountain expansion to feature more ways to collect copper – like a vermin resource. There is also always a chance for any given White Box to come out and mix things up – any (other) Indom with the copper tag would change things up quite noticeably, I believe (unless they troll us by putting it on a Gorm Indom or something like that).
It is also very much possible that the small part of the KD:M player base that has an active digital presence and that I have perceived on a regular basis around these release has an opinion not actually shared with the majority of existing players.
But, that could be said about basically any opinion put onto the internet, so.., I guess.., worst-case-scenario.., I invited you to a discussion that did not actually exist.
I should also mention, that whilst I was always “competent” with percentile and chance-based math, I am not by any means a “math-guy”. For all intents and purposes, my forte always lay with languages.
So, I do have rough numbers that I can/could share as to how good your odds are to get a copper or elastomer – but you shouldn’t bet your life’s savings on them.
***
Copper
Collecting copper is difficult.
Case closed. I am not disputing that fact.
To even be able to start semi-reliably collecting copper via the hunt-event Noodling of Death, you will have to defeat a Lvl2+ Frogdog and use its Bioluminescent Tonsils to make a Lure Lantern. But that is only the first step on a slow and arduous journey.
Not only do you have to collect the copper, usually 1 piece at a time, but you also have to unlock the Tuskworks, otherwise you won’t be able to craft anything.
To add this crafting location to your settlement you will have to defeat a Bullfrogdog, which itself is made available for you to hunt after you have managed to defeat a Frogdog Lvl3+ whilst you have Song of the Brave (I) innovated.
All that in itself is quite the list of things to go and do and the Bullfrogdog is also not exactly a push-over, dealing 5DMG and bleed on every collision during Charge (which replaces Leap for the fight), whilst also featuring a couple of new AI cards and Hit Locations unique to this variant.
Overall a Bullfrogdog is a more killy Frogdog Lvl3 with more hit points to chew through, whilst also more resistant to critical wounds.
But should you do it, the world of copper-crafting awaits!
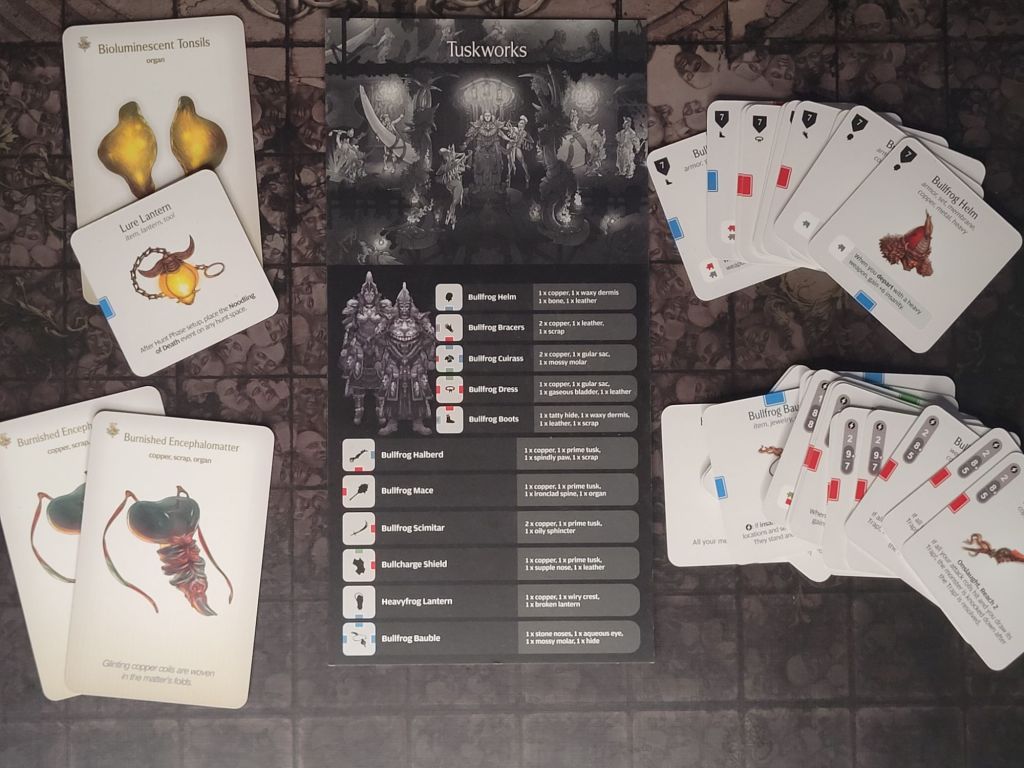
One full Bullfrogdog Armor set, a shield and weapon will set you back:
- 8 – 9 copper (depending on the weapon)
- 5 Leather
- 10 – 11 “normal” monster resources, some of them specific
- 4 Strange Resources from the Bullfrogdog
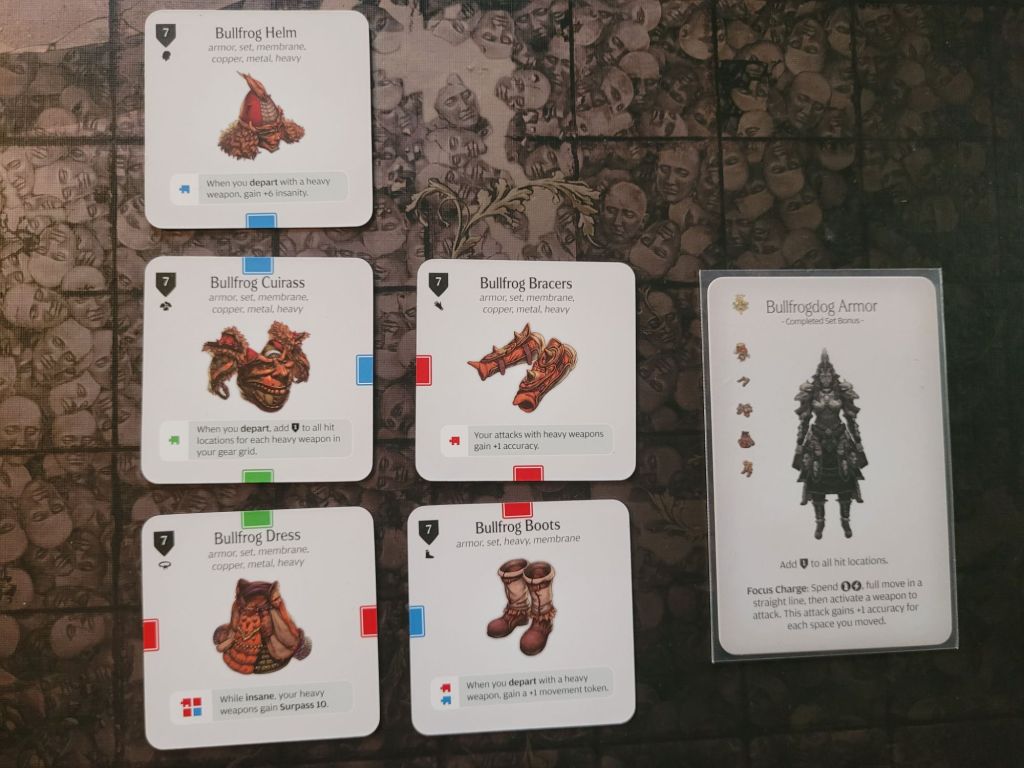
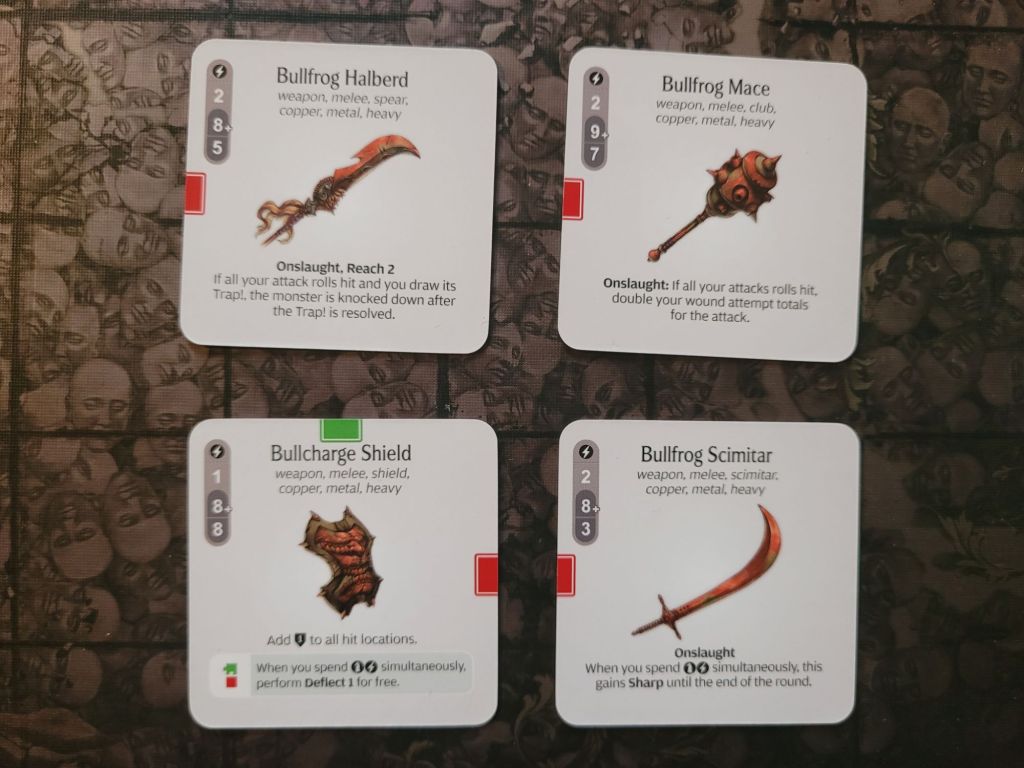
The Bullfrogdog Armor is fairly straight forward and built to synergize with heavy weapons and the Onslaught keyword. Onslaught will double your wound attempt totals if you are able to hit with all your attack rolls during a single attack, which the Maneuver on the Bullfrogdog Armor set-bonus Focus Charge should make a breeze. Add to that Surpass 10 from the Bullfrogdog Dress and you are in business – the business of monster-slaying!
Due to Onslaught, the copper weapons will be hitting monsters with 20 to 28 STR on average like this, WITHOUT ANY survivor stats added yet – all the way up to a possible 46.
A club master in particular can hit ridiculous numbers – my personal highest hit being 120 STR – whilst also usually dealing 2 to 3 wounds PER HIT with a chance for more depending on the weapon they are using.
And the armor does all that whilst also providing you with a cushiony 8 base armor, with +1 more for each heavy weapon you are carrying.
Furthermore, the Heavyfrog Lantern (which also costs 1 copper) will give any melee weapon you are carrying heavy at the cost of -1SPD and thus make it eligible for the set’s Surpass 10.
So, now that we have talked about the gear, where do you get all this copper from? Well.., you will likely get most of it from Noodling of Death.
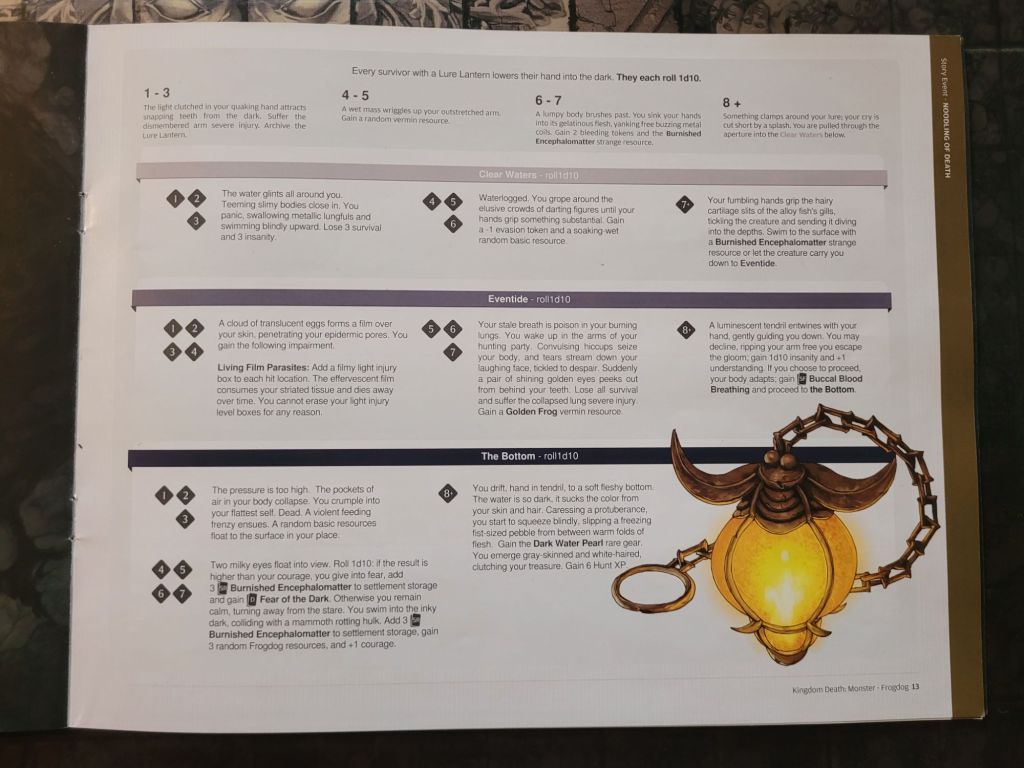
Noodling of Death is both a dangerous affair (the name gave that away) and stingy with the copper as well. You have a 30% chance to lose an arm in the initial roll as well as a chance at dying should you feel brave enough to dive any deeper than utmost necessary if given the chance.
Losing the arm wouldn’t even be that bad in most cases, if the event didn’t also eat your Lure Lantern as well, forcing you to hunt more Frogdogs to get back on track.
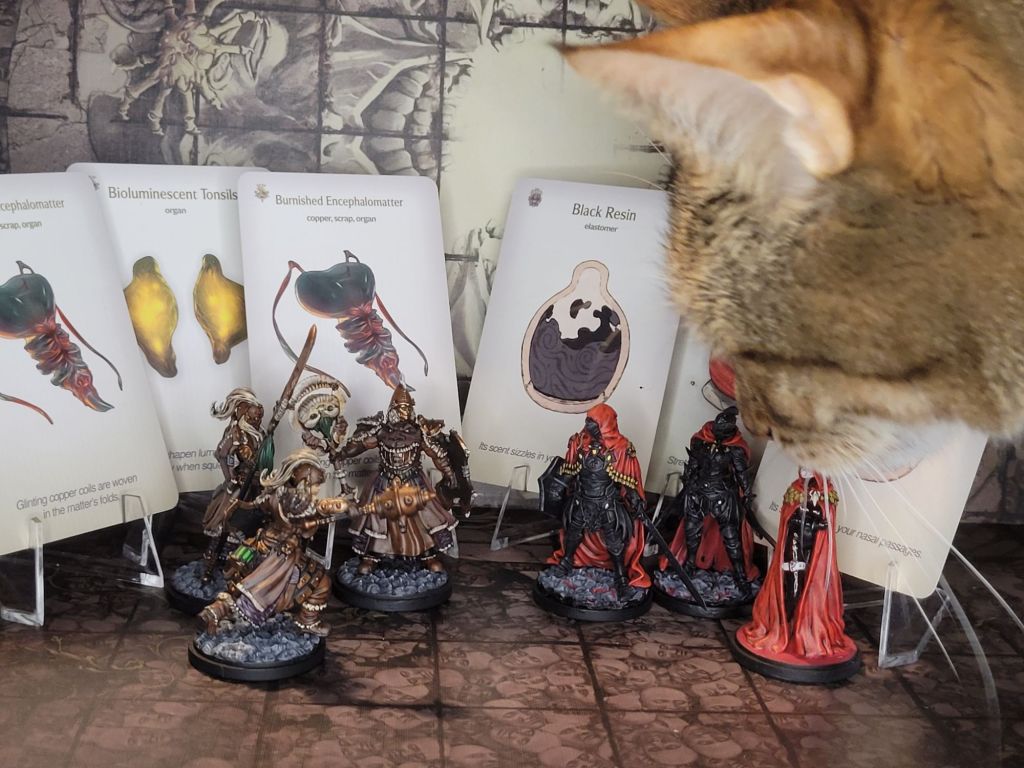
Still, I have found that there is a “right” way to do this. If you are seriously trying to collect copper, The Bottom result for 3 Burnished Encephalomatter is mostly going to be a trap (at a lousy 1.6% chance to hit it), instead you should be aiming for the copper further up. Taking both singular copper results into account you have about a 1 third chance of getting a copper per noodling event, which jumps to just over 50% if you are willing to invest rerolls into it to prevent the loss of your arm – which you likely should.
The gear you can craft from it is definitely worth it.
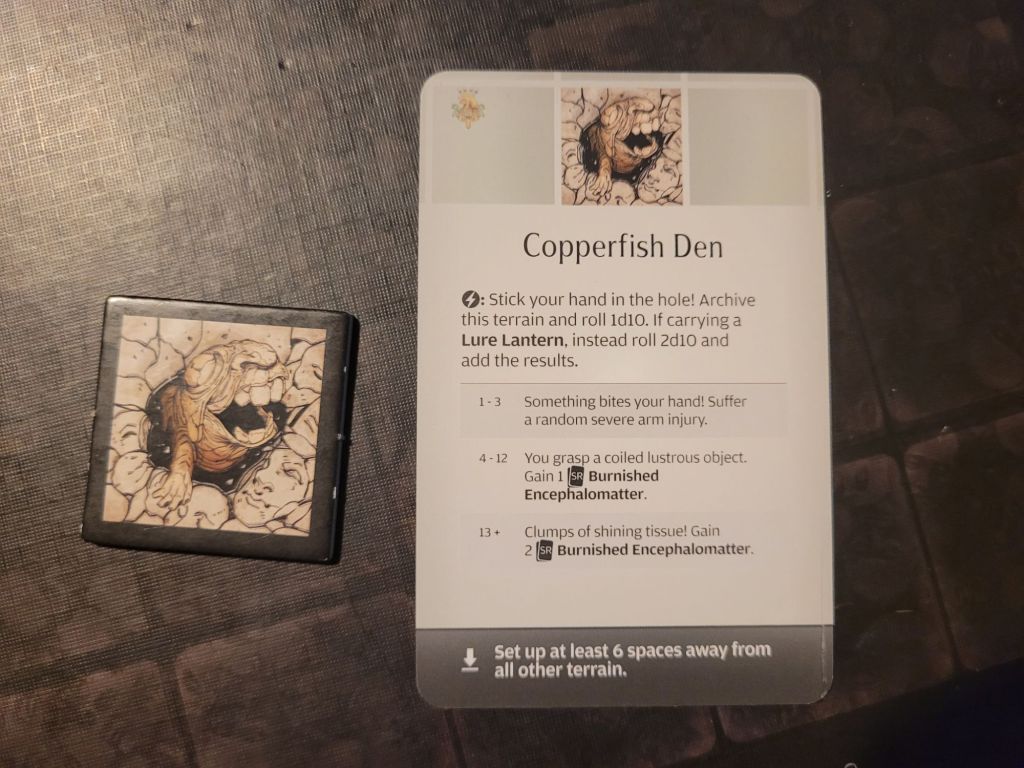
If these noodling prospects have got you down, there is a slight glimmer of hope though. The Frogdog expansion does come with a terrain tile similar to Ore Veins, which will give you copper on 4+ (and severe arm injuries on 1-3), with a chance at the illustrious 2 copper at once should you still have a Lure Lantern!
This makes the Copperfish Den terrain the by far single best means of getting copper. You just need to draw it ..
This also means you could start that copper-collection as early as during the Prologue-fight!
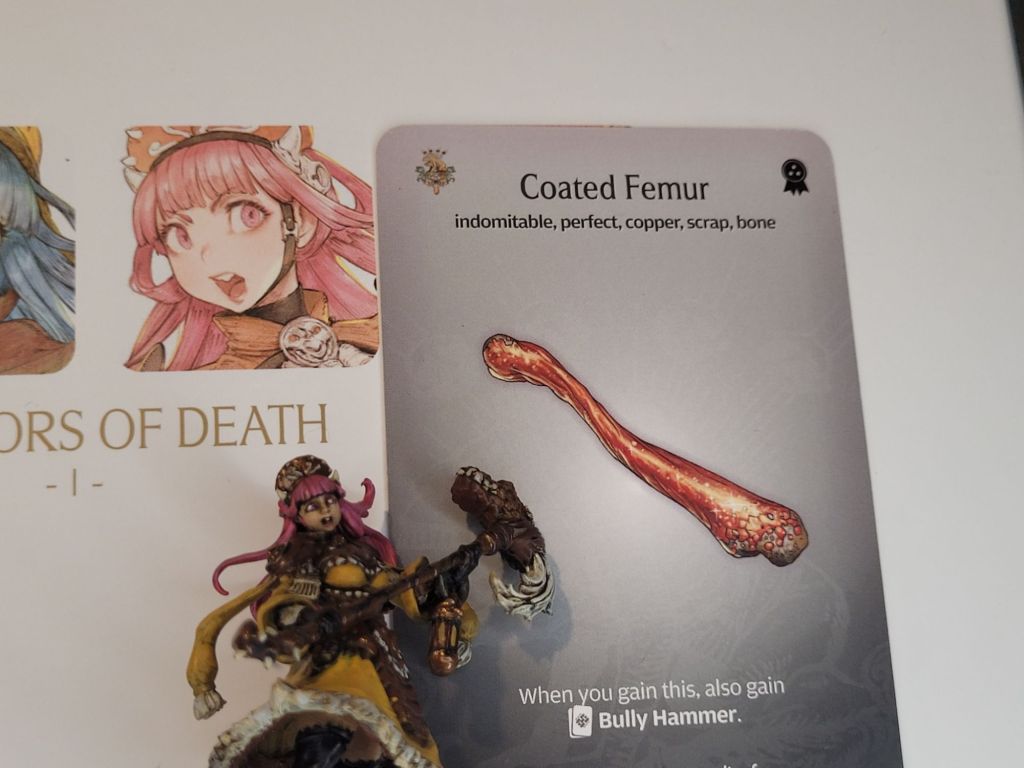
And, if you are willing to spend money on a White Box – Survivors of Death 1 includes an Indomitable Resource for the Frogdog that is a copper, effectively adding a 33% chance to any Frogdog Lvl3+ kill for a copper.
The Bully Hammer, the weapon built from the Coated Femur, does fit very nicely into the line-up of other copper gear as well, able to bring the *bonk* and build up ludicrous amounts of armor, but costs 3 copper effectively.
And once you have collected any amount of copper over the course of your campaign, by whatever means, whilst you are waiting and working on gaining access to the Tuskworks, the real foe of copper-collecting will eventually present itself: storage clearing events, like random feasts or losses against the Butcher.
These are devastating for any hoard of Burnished Encephalomatter! Starvation should also not be discounted and could blind-side you from time to time. Most survivors will eat damn-near anything if left unattended!
It also deserves special mention that Copper as a resource is also largely useless until you get to the late-game – that is a VERY expensive organ/scrap!
With the facts all out of the way:
The Bullfrogdog Armor and weaponry is LATE-GAME gear able to take on almost any foe with high STR and typically dealing multiple wounds to the monster per hit.
Gaining the ability to build these items is a slow process, spread across many lantern years but ultimately worth the investment.
Gathering copper is difficult, but overall you don’t actually need that much, especially as the Frogdog Mask has the outfit keyword and can replace the Bullfrogdog Helm initially. Still, you will likely end up fighting loads of Frogdogs in a campaign in which you are actively collecting copper.
On the other hand, the largest downside of most Copper weapons is that they basically require you to use the full set to function properly.
There is also the fact that it is built around being heavy – so watch your step.
***
Elastomer
Collecting elastomer isn’t actually that much easier.
There, I said it.
That’s my hot-take for the day.
Once you have defeated your first encounter with the Red Witches you will find a single strand of Red Thread left on the battle field and from it your survivors will gleam the idea to innovate Blood Weaving. Thus, from this single thread you will be able to craft a Red Cloak which enables you to place the Red Incursion hunt event.
If you are lucky enough to find your way into the Elastomer Mines you are then able to collect more Red Thread and Black Resin with the goal of building the Black and Red Armor.
This process does typically start a little later in your campaign (typically LY10 at the earliest) compared to gathering copper, but you are also going to pick up elastomer in larger volumes, which makes that part quicker.
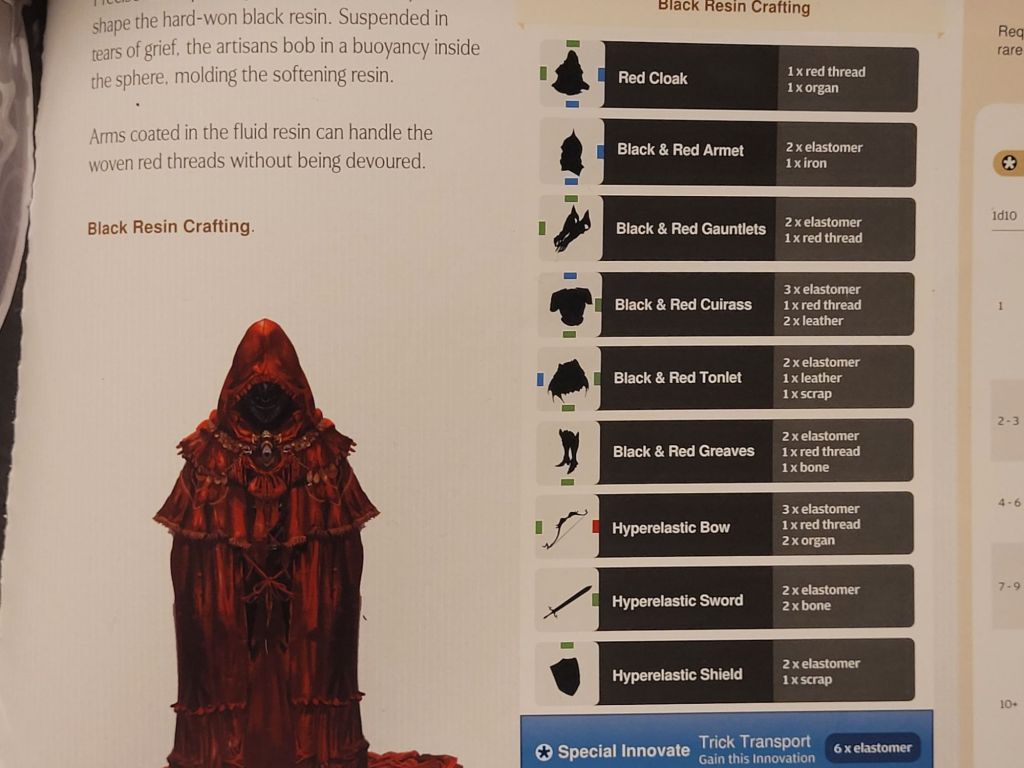
For 1 set of Black and Red Armor, a shield and a weapon, you will need:
- 15 – 16 elastomer
- 4 – 5 Red Thread
- 1 Iron
- 3 Leather
- 6 – 7 “normal” Monster resources
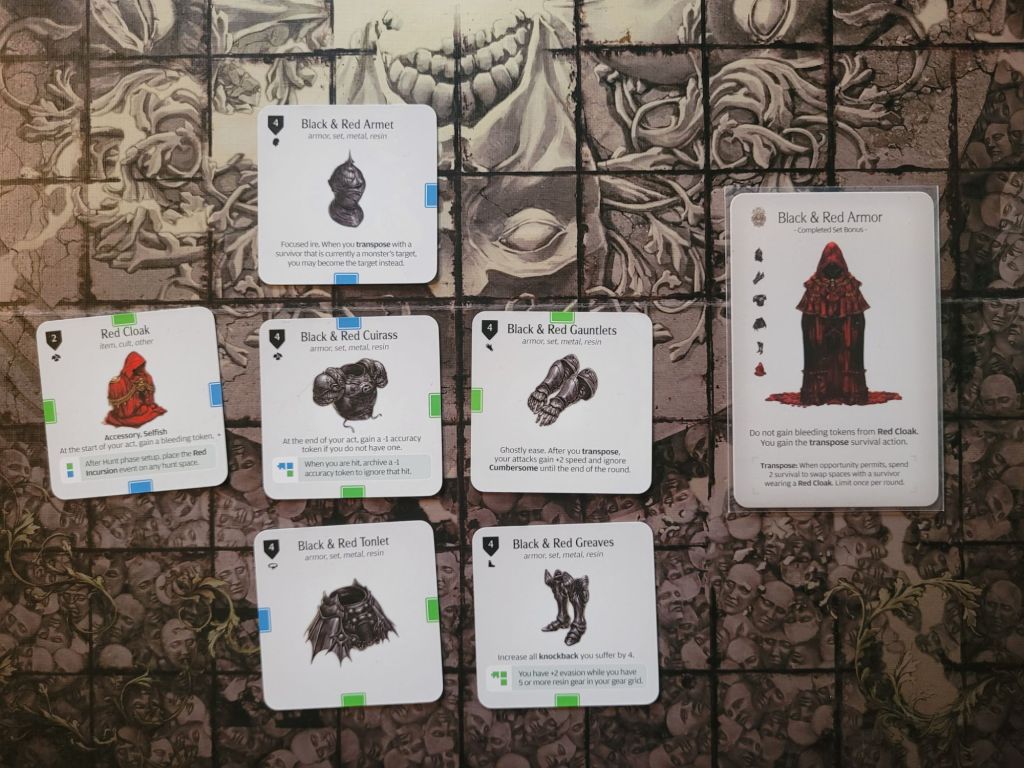
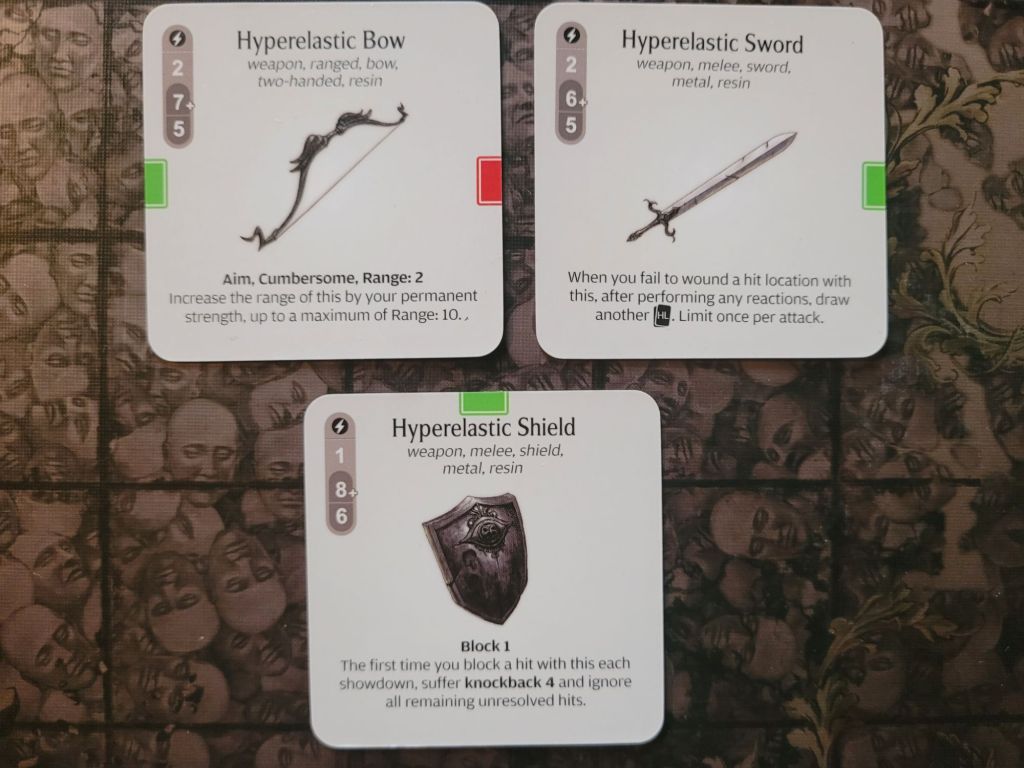
The completed Black and Red Armor set will allow your survivor to make use of the Transpose survival action, which is where most of its potential power and tactical flexibility comes from.
Whilst the armor itself is equivalent to a Leather Armor set in terms of actual armor points, it will also add +2EVA to your survivor and the ability to spend -1ACC-tokens to ignore a hit when attacked.
The weapons created from elastomer all have decently high STR values for the mid-game, paired with surprisingly low ACC but very interesting abilities.
But the real power and tactical depth is hidden in the Transpose ability. For 2 survival a survivor wearing the Black and Red Armor set is able to switch places with another survivor wearing a Red Cloak.
This not only means that the Black and Red Armor survivor can tank for a weaker member of the team, but also unfolds a much larger hidden potential once your settlement innovates Trick Transport (I).
This in and of itself is a fairly expensive endeavor for another 6 Elastomer but will give you (+1 Survival Limit and) the ability to set aside a gear grid with a full set of Black and Red Armor to be switched in DURING the showdown!
Whilst this can be used only once per Lantern Year, and you need both the innovation and 2 full sets of Black and Red Armor, being able to switch in a fresh survivor from back home leaves you with many different approaches – from making use of Scab Weapons and transposing away to keeping old survivors in the fight a little longer by having them skip the aftermath, these are only 2 of the most obvious possible applications.
That being said .. it is expensive. You are looking at at least 28 elastomer and 8 Red Thread besides the “regular” resources as well.
Which leaves us with the question: Where does elastomer come from?
Apparently from Gryphon-spit.., but we aren’t that far up the Inverted Mountain yet, so .. it’s from the Elastomer Mines!
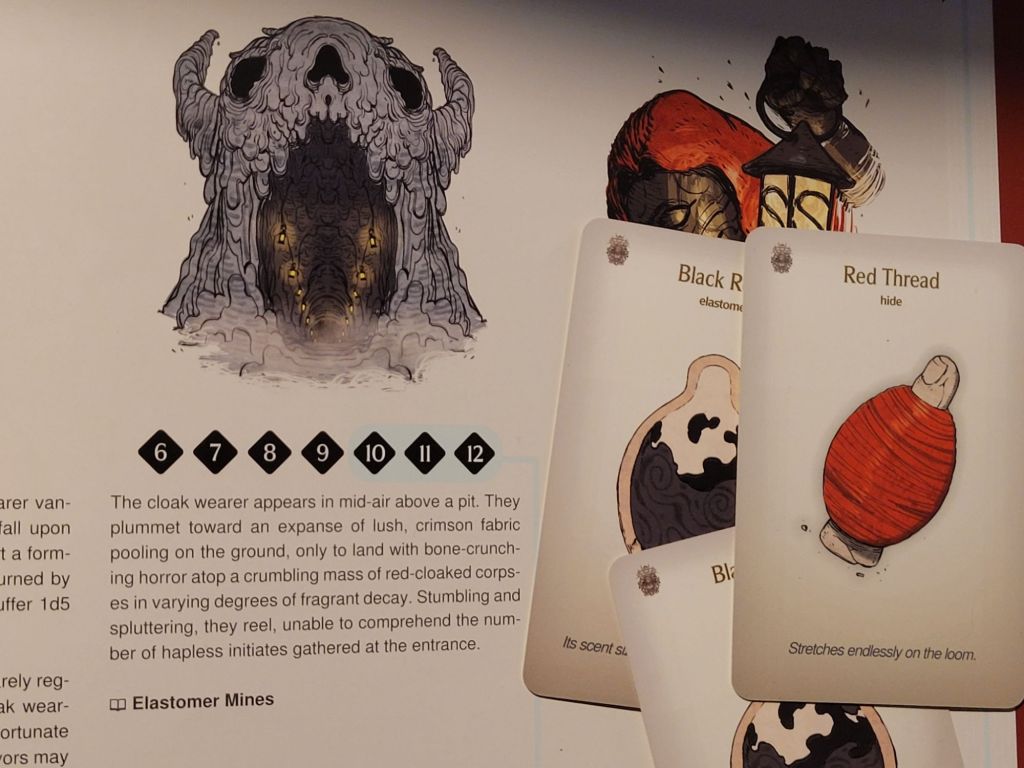
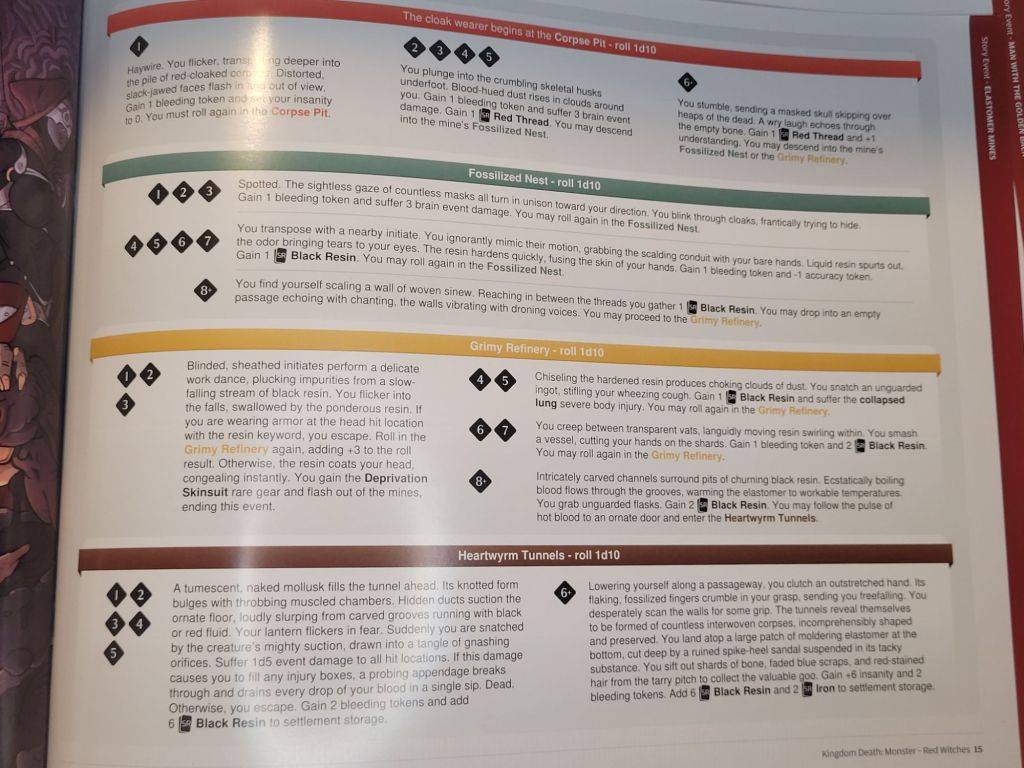
With elastomer the “hard part” of collecting it shifts at little, because taking some home from the mines is easy-peasy-resin-duct-squeezy and mostly only limited by how many bleeding tokens you can and are willing to take.
Once you are in the mines you have a whopping 99.99% chance to gain a Red Thread before transposing either deeper into the mine our out. Oh, and those 0.01% are you ending up dead from bleeding to death.
If you end up transposing deeper into the mines, you will end up with a 70% chance in each layer to pick up at least 1 elastomer. The variable amount of rerolls you can use here makes it real hard for my brain to give you a more defined number for each result – but I’m sure somebody already did that somewhere on the internet.
Just remember: chance for elastomer high!
And unlike with Mineral Gathering you also gain elastomer when going deeper and are NOT forced to chose between either resource or exploration.
Should you in turn find the way to the lowest of depths – at slightly lower than 10% odds I believe (though rerolls can push that number quite high 40-ish%, if not 50-ish%), you are greeted either by a giant mollusk or a dead squire and more importantly, in both cases should you survive the former, 6 elastomer directly sent to your storage.
There is a tricky part, though. And I don’t think this gets nearly enough attention:
You need to get into the mines first.
Whilst most gathering-type hunt events (including Noodling of Death) allows for all survivors with the tool in question in the hunting party to roll on the table, only a single person wearing a Red Cloak can attempt the Long Range Transmogrification .. and they only have a 6+ chance to even end up in the mines – that’s an even 50/50 on that (first) roll.
And whilst you get a neat +3 bonus to said roll when you are wearing a full Black and Red Armor set, that first set will be noticeably harder to get.
Yes, before you get angry at me, I know there is another result that allows you to reroll your Long Range Transmogrification roll at +2, but your party gets beat up for it and you already have 2 bleed – so I don’t know how much you really want to take those odds to the deeper parts of mines.
But to be fair, its probably still 1 Red Thread & 1 elastomer and not an entire Lantern Year lost.
And whilst we have no other “outs” just yet for gathering these resources, the Gryphon expansion (QN4 for the Inverted Mountain) will likely add more ways to gather elastomer for this set and its interactions.
Uhm, and survivors will of course also eat these resources if starving and given the chance. So, as always, watch out for that.
Again, for a quick summary:
The Black and Red Armor is a MID-GAME armor offering various approaches to tanking the monster, that will develop into a piece of tactical equipment once you have collected a 2nd full set and unlocked an additional innovation.
Gathering resources to this end can be fast if you find yourself travelling to the Mines often enough and are able to go deep enough.
The weapons hit reasonably hard for LY10+ but the lack in ACC can be stifling, whilst the shield will likely stay relevant quite long for its ability to outright cancel 1 full monster attack per showdown.
Overall it isn’t dependent on elastomer weaponry to function, which offers huge late-game variability, especially when combined with the extra survivor transposing into the ongoing fight.
As far as downsides go, I would say the main factor with this armor is that is a bit of a grid-space-hog. To complete the armor set you already need 6 pieces, so in a PotLantern campaign you are down to a single open gear slot (assuming 1 weapon and a lantern).
And even without the lantern-requirement, you will likely feel quite limited when it comes to the gear that you can bring along to a hunt.
***
***
Conclusion
On the one hand comparing these resources and armor sets is a little like comparing apples and oranges – they are both round and that is about it.
On the other, I did want to do this to highlight that collecting copper isn’t actually all that bad when you compare it to collecting elastomer, especially when you start looking at how much you need of each resource.
Copper:
- 8 – 9 copper
- 5 Leather
- 10 – 11 “normal” monster resources
- 4 Strange Resources
Elastomer:
- 15 – 16 Elastomer
- 4 – 5 Red Thread
- 1 Iron
- 3 Leather
- 6 – 7 “normal” Monster resources
Copper, whilst a lot harder to come by, is needed in a much smaller quantity to build the Bullfrogdog items, despite it clearly being a late-game set of gear. Meanwhile elastomer gets thrown at you in the mines, but you will need about 30 – three times as much – if you want to fully make use of the set’s true capabilities.
In turn, the Bullfrogdog Armor set has a clear purpose and whilst its base-line for effectiveness is very high in my opinion, it is made for a singular purpose: to flatten monsters via *bonk*.
On the other hand, the Black and Red Armor has an overall medium-level base-line for what it tries to do, but is only limited by what it can do in relation to the Abilities, Fighting Arts, (Knowledges,) items and weaponry throughout the entirety of your settlement.
At this point, I can’t help but feel like the initial reactions to these two resources – “copper bad, elastomer good” – boils down to the volume at which you collect them by – at the very least partially. The fact that you are more likely to experience Black and Red gear as it is naturally available a lot earlier in the timeline of any given campaign should also further feed into this.
It is hard for me to even form an estimate as to how many people have played with Bullfrogdog items at this point. As it feels quite difficult to me to quantify how many people regularly kill Lvl3+ monsters at all.
I, myself, have finished 3 full Bullfrogdog sets over the last 2 years, and 2 partial ones and I, the simple man that I am, enjoyed playing with these items immensely.
…
Having given the acquisition of the actual items a little more thought for each resource type and comparing it to my personal experience, I do have to say, collecting copper and building any amount of Bullfrogdog gear has typically happened in 2 phases – many long Lantern Years of collecting the resources and getting the prep-work done for the Tuskworks, before I built most of what I wanted over 2 Lantern Years of back to back Bullfrogdog fights – typically around LY22~23.
For Black and Red Armor, in stark contrast, I have spend several Lantern Years accumulating pieces of the gear one-by-one, finishing the armor bit by bit.
So, taking this into consideration, I am fairly sure that this does indeed feed into the initial perception, with Bullfrogdog gear having little to no pay-off at all if your campaign falters at any of the typical breaking points beforehand, but it leaves a lasting impression if you make it to the late-game with enough copper in hand.
…
At the end of the day, I think both the sets I looked at today are great, with the caveat that building the more expensive one (Bullfrogdog) isn’t as hard as the community makes it out to be, especially if your campaign has been going well enough to kill monsters at Lvl3, whilst the cheaper one (Black and Red) actually needs a lot more materials and isn’t as easily gotten as you’d think.
At least that is my opinion on the matter.
***
Before I call it quits for today, I’ll take this chance to once again encourage you, dear reader to try out items – weapons – gear for yourself and don’t just put them aside in the name of “optimal play” or the online consensus.
Whilst winning is naturally part of the fun for a lot of people, it sure is for me too, there are so many fun interactions in this game hidden off the beaten path.
This goes double if you are playing as a group.
Go, on, build that Bloom Sphere next time! It’ll be funny once it works out.
Or.., have you ever wounded a White Lion Lvl3 15 times in a single attack roll? I have. Paired Sonic Tomahawks will let you do that. Is it likely to work out? Not really. It worked exactly once this well. But as long as you are able to take the trap once or twice per fight, you’ll be fine! Savage will do the rest!
If you use them against the Great Golden Cat it’ll be a glass cannon death match!
As always thank you very much for your time! I’m not entirely sure why, but I started seeing today’s topic like a high school drama as I was getting to the end of it: the Bullfrog-jock bullying the Elasto-nerd.
Amathul


Leave a Reply